Hockey 101: Basic Breakout Strategy for Beer League Hockey
This is part of our Hockey 101 series: positioning and team systems for beginner and intermediate players, and for teams that never get a practice.
The breakout is how your team gets the puck out of its own end with a plan instead of a prayer. It is a set of positions and decisions that moves the puck from the defensive zone to the neutral zone, and it is the single most useful system a beer league team can learn.
Why run a breakout?
A shared breakout lets everyone use the ice better and anticipate where teammates will be. When a defender knows she has two or three options, and roughly where each will be standing, she can decide faster and spend her attention on making the pass. Forwards move together instead of scattering, which exposes the most common weakness of a beer league forecheck: everyone chasing the puck.
A clean breakout also leads straight to offense. Plenty of rushes, and plenty of goals, start with a calm first pass in your own end.
Defensemen: control, space, pass
The basic breakout starts when a defender gains control of the puck. Her first job is to skate to soft ice, often the quiet zone behind the net. That usually means skating back toward your own end, which feels wrong to a lot of beer league players who think forward is the only good direction. Retreating with the puck buys the forwards time to shake their checks and get into position, and it buys you the time and space to make a good pass.
Advanced systems have a menu of set plays for defenders. At the basic level the job is simple: find empty space, control the puck, make a pass. The partner away from the puck stays near the net, and can slide behind the goal line to offer a D-to-D outlet.
Forwards: swing low
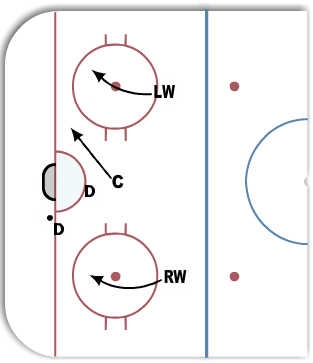 Forwards start the breakout by swinging low, which means skating deeper into your own zone, often to just below the faceoff dot. If you have never done it, it feels crazy. The point is to create space away from the forecheckers and set up the whole unit to move up the ice together.
Not swinging low is the classic beer league mistake. When your defender has the puck, the wrong play is to turn your back and bolt up the ice (unless there is truly nobody pressuring her). A clean pass from deep in your zone, past the red line and through several opponents, is close to impossible. Even if it gets through, catching a pass with your back to the puck is hard, and if it is turned over there is nobody left to support.
If your skating allows it, keep your upper body facing the middle of the zone as you curl. You never turn your back on the puck, and you can still see the opposing players around you.
Putting your back directly to the passer is rarely a good choice. Skating backward up the ice to take a pass is also risky, and in full contact hockey it can be dangerous to your health.
The first pass
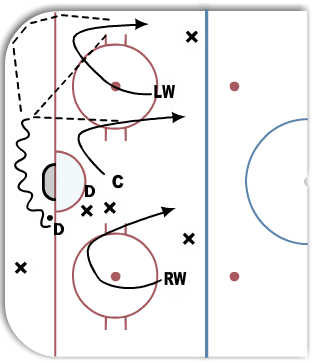
The strong side winger (the side with the puck) and the center both need to be available for a pass as they cross the hash marks, as shown in the diagram. The defender normally passes to one of them, and the pass has to come quickly. Do not wait, and do not carry the puck longer than you need to.
If the defender is under pressure, she has a few outs:
- Make a delay move (a quick turn) to shake the forechecker.
- Pass D-to-D to her partner, usually behind the net.
- Rim the puck along the boards to the winger, although a tape to tape pass is better.
- If both forwards are tied up and the D-to-D is not there, put it high off the glass and out.
Passing across the slot in front of your own net, or trying to clear straight up the middle third of the ice, is too risky in almost every situation.
Exiting the zone: read the opposing defender
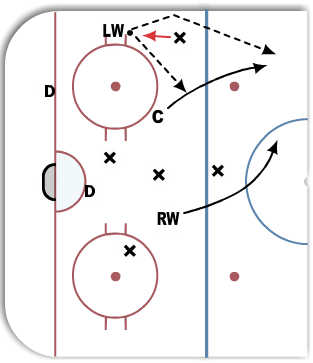
A winger who takes the pass on the boards is usually facing the opposing defenseman at the blue line. That defender has two choices, and each one tells you what to do.
- The defender backs out. He retreats off the blue line as the breakout comes. The winger can skate the puck out or pass across to a forward with speed.
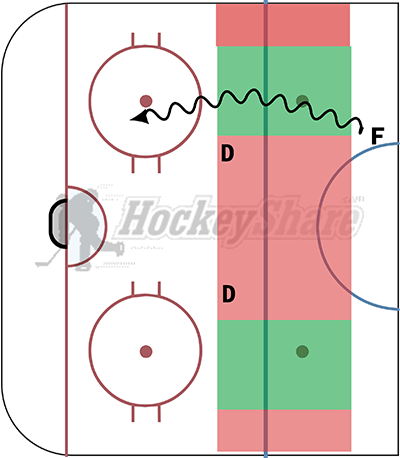
- The defender pinches. He jumps up to challenge, as in the diagram. The winger has to move the puck fast, either into the middle or with a chip off the boards past the pinch for the center to skate onto.
When the breakout gets in trouble
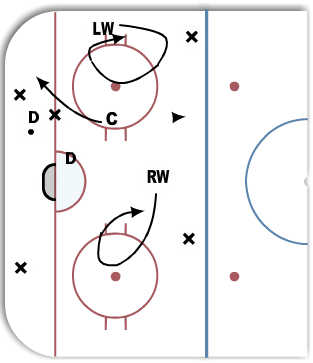
If the defender is delayed or challenged, the wingers must be ready to drop back into normal defensive zone coverage. A delay can also mean the forwards repeat the swing (see diagram), staying close enough to their defensive positions to recover if the puck is turned over.
The center can go down to support the defender in a battle along the boards or in the corner.
And as always in hockey, keep moving. Standing at the blue line waving your stick for the puck is a popular beer league strategy. Do not do it, you are not a spectator.
Aggressive option: fly the wing
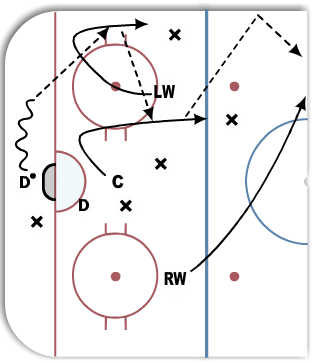
When a defender has clear control and it is obvious which side the breakout is going, the weak side winger can leave the zone early.
The breakout runs as usual, to the strong side winger on the boards or the center through the middle. Either of them can then chip or pass the puck ahead to the weak side winger for a breakaway or an odd man rush.
The flying winger usually cuts diagonally across the ice, which makes her easier to hit with a pass and puts her in position to chase pucks chipped up the strong side boards. Use it with care: if the puck does not get out, your team is a forward short in its own end.
Recap
Defensemen
- Gain control of the puck
- Find space
- Make a pass (five options)
- Boards pass (usually to the winger)
- Middle pass (usually to the center)
- D-to-D (behind the net)
- Rim
- High off the glass
- Minimize risk
- No stretch passes
- No dangles in your own circle
- No passes through the slot
Forwards
- Swing low
- Curl to the strong side
- Face the middle (the puck and the forecheckers)
- Make a quick pass, or chip it off the boards
- Stay aware of your defensive position
- Never stand still
Once you are out of the zone with possession, the next problem is the middle of the ice. If the rush stalls, use a neutral zone regroup before you force a bad entry.
Bottom line
Defenders retreat to space and move it quickly. Forwards swing low, face the puck, and support each other. Nobody throws it up the middle. Get five players on the same page and your team will spend a lot less time stuck in its own end.
Getting the same five players on the ice every week is half the battle. If your lineup still gets sorted out by group text, that is what RosterFX is for.
Keep reading: Hockey 101: Neutral Zone Regroup · Hockey 101: Offensive Zone Entry · Defensive Puck Movement · More Hockey 101