This is one of a series called Hockey 101, addressing the basics of hockey positioning and systems appropriate for a beginner to intermediate player and their team.
Offensive Zone Structure
Until the 1970s, most hockey was played with more structured positions for the length of the ice.
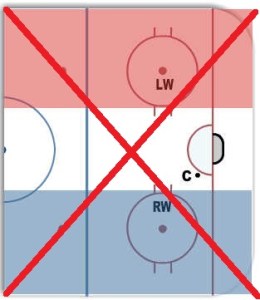
The Soviet team taught us that this wasn’t the best way to play and modern offensive systems today do not use this system.
F1 F2 F3
Today, for most coaches, talking about offensive positioning is not a matter of talking about center and wings, but rather talking about three interchangeable positions, F1, F2 and F3. Offensive zone positioning fundamentally comes down to creativity and trying to develop chaos for defending teams while controlling the puck in a structured way.
Although there are a variety of positions an attacking team can occupy in the offensive zone, there one very important structure that continually re-appears in offensive zone positioning.
 Attack Triangle
In the offensive zone, forwards should work to maintain a triangle. This arrangement has several important features:
- There are always multiple passing options with multiple angles on the net
- There are puck support options at every position
A forward should always have multiple passing options if this formation is properly used, as well as good support. As with anything, this “rule” can be broken for certain types of plays, but it is a good rule of thumb.
Important Thoughts
There are a couple things that should be considered during offensive zone play.
- Maintain a presence in the “scoring area” in front of the net. At least one player should remain out front to collect rebounds, receive passes and force defenders to respect your position.
- Get open for a pass. Continue moving to find “soft spots” on the ice where you have time and space to receive a pass and make a shot.
- Support the puck carrier. The player who is closest to the puck carrier should balance the goals of being open for a pass and in the scoring area with the need to support the puck carrier and be available if he drops the puck, or is tied up on the boards.
A common mistake in beer league is to float far away from the puck in an effort to be “open”. Instead of thinking about being open, think about how to find angles of “support” for the puck carrier.
- For more discussion on offensive zone positioning and a few set plays for this formation, check out the article on basic offensive zone entry.